


The Flutter ListView widget is a common scrolling widget that helps to put multiple items under it and provides either horizontal or vertical scrolling.
The ListView widget provides several constructors that allow you to customize its behaviour according to your needs. Some of the most common constructors include:
ListView: It is a simple widget where we provide the widget list inside the children parameter.
ListView.builder: This constructor creates a list of items based on a builder function. This is useful when you have a large number of items to display and you don't want to create them all upfront.
ListView.separated: This constructor creates a list of items separated by a divider. This is useful when you want to visually distinguish between items in the list.
ListView.custom: This constructor allows you to create a custom list that is not based on a fixed set of data. This is useful when you must create a dynamic list generated based on user input or some other criteria.
Let us learn each of them.
A Simple ListView widget
To create a ListView widget, here is an example with ListTile widgets as children.
Syntax:
ListView(
  children: const <Widget>[],
),
Example
main.dart: https://dartpad.dev/?id=bfd37797b8cc00c35e35b98601bdc82d
// a simple listvtview widget example by allaboutflutter
class ListViewTutorial extends StatelessWidget {
const ListViewTutorial({Key? key}) : super(key: key);
@override
Widget build(BuildContext context) {
return Scaffold(
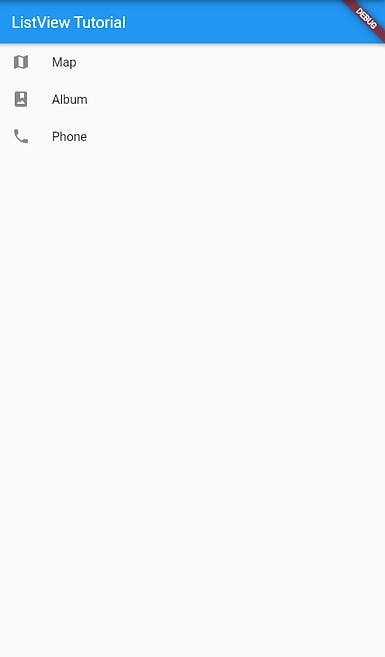
appBar: AppBar(title : const Text("ListView Tutorial")),
body:
ListView(
children: const <Widget>[
ListTile(
leading: Icon(Icons.map),
title: Text('Map'),
),
ListTile(
leading: Icon(Icons.photo_album),
title: Text('Album'),
),
ListTile(
leading: Icon(Icons.phone),
title: Text('Phone'),
),
],
),
);
}
}
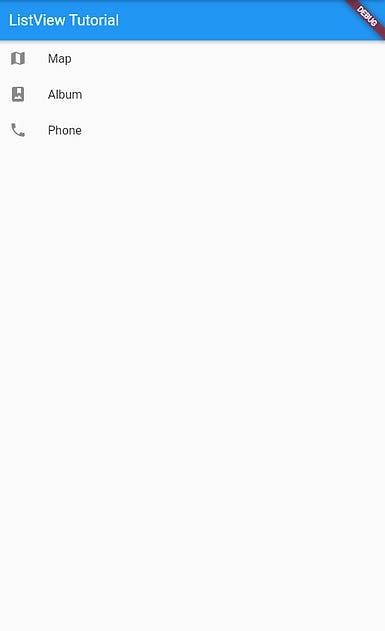
Output
ListView.builder - build a list
The .builder function of the ListView allows to build many similar items. It comes in handy when you have a collection of the same type of items. It allows you to lazily generate and display a list of widgets based on a builder callback.
Syntax
ListView.builder(
  itemCount: itemCount, // Required: The total number of items in the list
  itemBuilder: (BuildContext context, int index) {
    // Required: Builder callback function that creates a widget for each item
    // 'context' is the BuildContext for the widget tree
    // 'index' is the index of the current item being built

    // Return the widget for the current item
    return YourListItemWidget(data: dataList[index]);
  },
)
Example: https://dartpad.dev/?id=c8c3cdb3b08a3a48c7e95debf8ce8435
main.dart
// a listview.builder widget example by allaboutflutter
class ListViewTutorial extends StatelessWidget {
const ListViewTutorial({Key? key}) : super(key: key);
@override
Widget build(BuildContext context) {
return Scaffold(
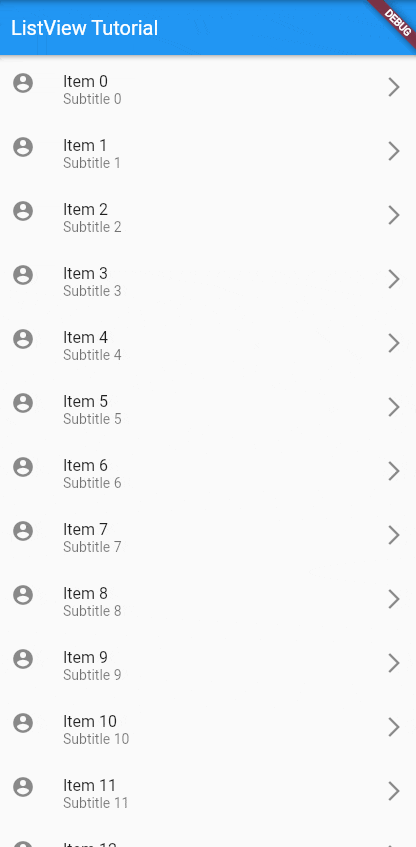
appBar: AppBar(title: const Text("ListView Tutorial")),
body: ListView.builder(
itemCount: 100,
itemBuilder: (context, index) {
return ListTile(
title: Text("Item $index"),
subtitle: Text("Subtitle $index"),
leading: const Icon(Icons.account_circle),
trailing: const Icon(Icons.arrow_forward_ios),
);
},
),
);
}
}
Output
ListView.separated - Insert separators
As the name suggests, we can add separators to the ListView builder function using separated. Have a look at the syntax
Syntax
ListView.separated(
  itemCount: itemCount, // Required: The total number of items in the list
  separatorBuilder: (BuildContext context, int index) {
    // Required: Separator builder callback function that creates a widget for each separator
    // 'context' is the BuildContext for the widget tree
    // 'index' is the index of the current separator being built

    // Return the widget for the current separator
    return YourSeparatorWidget();
  },
  itemBuilder: (BuildContext context, int index) {
    // Required: Builder callback function that creates a widget for each item
    // 'context' is the BuildContext for the widget tree
    // 'index' is the index of the current item being built

    // Return the widget for the current item
    return YourListItemWidget(data: dataList[index]);
  },
)
YourSeparatorWidget with the widget you want to display as a separator, and YourListItemWidget with the widget you want to display for each item.
Example: https://dartpad.dev/?id=ca50b70f401665cb09f8a0d4f79b2c75
main.dart
// a ListView.separated widget example by allaboutflutter
class ListViewTutorial extends StatelessWidget {
const ListViewTutorial({Key? key}) : super(key: key);
@override
Widget build(BuildContext context) {
return Scaffold(
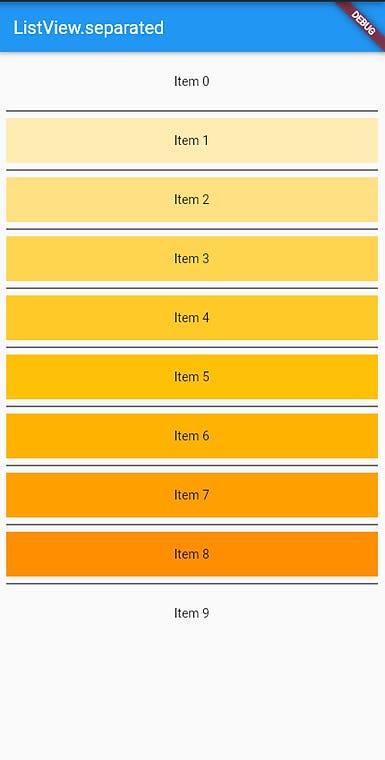
appBar: AppBar(title: const Text("ListView.separated")),
body: ListView.separated(
padding: const EdgeInsets.all(8),
itemCount: 10,
itemBuilder: (BuildContext context, int index) {
return Container(
height: 50,
color: Colors.amber[100 * (index % 9)],
child: Center(child: Text('Item $index')),
);
},
separatorBuilder: (BuildContext context, int index) =>
const Divider(color: Colors.black),
),
);
}
}
Output
ListView.custom - Customize Like anything
The ListView.custom constructor in Flutter provides a way to create a highly customizable list view by specifying a custom SliverChildDelegate that defines how the list items should be built and laid out.
Syntax
ListView.custom(
  childrenDelegate: SliverChildDelegate(
    findChildIndexCallback: (Key key) {
      // Required: Returns the index of the widget with the given key
      // Return null if the key is not associated with any widget
      // You can use this callback for optimizations like item removal or reordering
      return findIndexByKeyFunction(key);
    },
    childCount: itemCount, // Required: The total number of items in the list
    itemBuilder: (BuildContext context, int index) {
      // Required: Builder callback function that creates a widget for each item
      // 'context' is the BuildContext for the widget tree
      // 'index' is the index of the current item being built

      // Return the widget for the current item
      return YourListItemWidget(data: dataList[index]);
    },
  ),
)
Example: https://dartpad.dev/?id=67eba1c89415a6ce1a87c18120effa53
main.dart
// a ListView.custom widget example by allaboutflutter
class ListViewTutorial extends StatelessWidget {
  const ListViewTutorial({Key? key}) : super(key: key);

  @override
  Widget build(BuildContext context) {
    return Scaffold(
      appBar: AppBar(title: const Text("ListView Tutorial")),
      body: ListView.custom(
        childrenDelegate: SliverChildListDelegate(
          [
            const ListTile(
              leading: Icon(Icons.map),
              title: Text('Map'),
            ),
            const ListTile(
              leading: Icon(Icons.photo_album),
              title: Text('Album'),
            ),
            const ListTile(
              leading: Icon(Icons.phone),
              title: Text('Phone'),
            ),
          ],
        ),
      ),
    );
  }
}
Output
Hence we learnt all the different types of ListView widgets and covered different examples and use cases as well. Follow for more tutorials like this.