

Flutter: TabView Widget Tutorial


Table of contents
In this tutorial, we are going to learn how to create Tabs in Flutter using the TabView widget. There are plenty of apps using Tabs and they provide a clean and compact design of the app.
Project Setup
We do not need and other plugins for this tutorial. Also, you can proceed with your project or create a new project for this tutorial.
Here is the Starting Code of the app.
import 'package:flutter/material.dart';

void main() {
  runApp(MyApp());
}

class MyApp extends StatelessWidget {
  @override
  Widget build(BuildContext context) {
    return MaterialApp(
      title: 'TabView Tutorial All About Flutter',
      theme: ThemeData(
        primarySwatch: Colors.yellow,
      ),
      home: HomePage(),
    );
  }
}

class HomePage extends StatelessWidget {
  const HomePage({Key? key}) : super(key: key);

  @override
  Widget build(BuildContext context) {
    return Scaffold();
  }
Code
There are mainly two ways of creating Tabs in Flutter. First using DefaultTabController widgets and second TabController.
For this tutorial, we are going to use DefaultTabController. It is very easy to set up and all descendants or child widgets inherit the TabController. We don't need to provide the TabController separately.
So where we have returned the Scaffold widget replace it with the DefaultTabController widget.
return DefaultTabController(
  length: length,
  child: child,
);
Now here we have to provide the length and the child.
length is the number of tabs and child is the child widget you want to display.
I will use three tabs so the length will be equals to 3 and the child will be a Scaffold widget.
DefaultTabController(
  length: 3,
  child: Scaffold(
    appBar: AppBar(
      title: Text("Tabs AAF"),
    ),
    body: Container(),
  ),
);
But we need to display the Tabs. So AppBar has a field and that is the bottom field. Here we will provide the list of Tabs in the TabBar widget.
AppBar(
  title: Text("Tabs AAF"),
  bottom: TabBar(
    tabs: [
      Tab(
        icon: Icon(Icons.home),
        text: "Home",
      ),
      Tab(
        icon: Icon(Icons.account_box),
        text: "Account",
      ),
      Tab(
        icon: Icon(Icons.web),
        text: "Internet",
      ),
    ],
  ),
),
Here are the Tabs. Remember that the number of the Tabs and the length should be the same.
Now let us provide some content to our app.
In the body field of the Scaffold widget, we are going to place the contents in each tab. Here we are going to use the TabBarView widget and in the children field, we provide the list of widgets and here it is three.
body: TabBarView(
  children: [],
),
Now I am going to use display a Text widget at the centre of the screen. It is completely your choice what you want to display.
Again remember that the number of children should be three.
TabBarView(
  children: [
    Center(
      child: Text(
        "Home",
        style: TextStyle(
          fontSize: 32.0,
          fontWeight: FontWeight.w700,
        ),
      ),
    ),
    Center(
      child: Text(
        "Account",
        style: TextStyle(
          fontSize: 32.0,
          fontWeight: FontWeight.w700,
        ),
      ),
    ),
    Center(
      child: Text(
        "Internet",
        style: TextStyle(
          fontSize: 32.0,
          fontWeight: FontWeight.w700,
        ),
      ),
    ),
  ],
),
Now run the app and see the result.
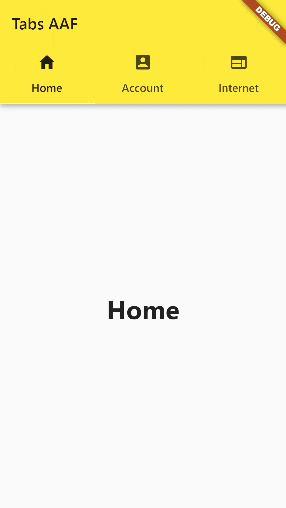
So we have successfully implemented tabs in our app.
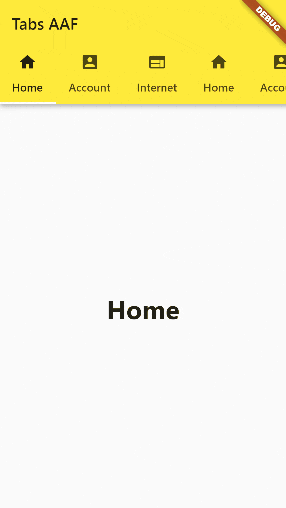
But there might be chances where the number of tabs is much more. In such instances, if we do not modify our code the tabs will be shrunk giving a very bad appearance to the app. Instead, in the TabBar widget, there is a field isScrollable. It takes a boolean value and if it is true the Tabs at the top become scrollable.
So I am modifying the code to the number of tabs six and just duplicating the contents of both TabView and TabBarView and TabBar as follows.
DefaultTabController(
  length: 6,
  child: Scaffold(
    appBar: AppBar(
      title: Text("Tabs AAF"),
      bottom: TabBar(
        isScrollable: true,
        tabs: [
          Tab(
            icon: Icon(Icons.home),
            text: "Home",
          ),
          Tab(
            icon: Icon(Icons.account_box),
            text: "Account",
          ),
          Tab(
            icon: Icon(Icons.web),
            text: "Internet",
          ),
          Tab(
            icon: Icon(Icons.home),
            text: "Home",
          ),
          Tab(
            icon: Icon(Icons.account_box),
            text: "Account",
          ),
          Tab(
            icon: Icon(Icons.web),
            text: "Internet",
          ),
        ],
      ),
    ),
    body: TabBarView(
      children: [
        Center(
          child: Text(
            "Home",
            style: TextStyle(
              fontSize: 32.0,
              fontWeight: FontWeight.w700,
            ),
          ),
        ),
        Center(
          child: Text(
            "Account",
            style: TextStyle(
              fontSize: 32.0,
              fontWeight: FontWeight.w700,
            ),
          ),
        ),
        Center(
          child: Text(
            "Internet",
            style: TextStyle(
              fontSize: 32.0,
              fontWeight: FontWeight.w700,
            ),
          ),
        ),
        Center(
          child: Text(
            "Home",
            style: TextStyle(
              fontSize: 32.0,
              fontWeight: FontWeight.w700,
            ),
          ),
        ),
        Center(
          child: Text(
            "Account",
            style: TextStyle(
              fontSize: 32.0,
              fontWeight: FontWeight.w700,
            ),
          ),
        ),
        Center(
          child: Text(
            "Internet",
            style: TextStyle(
              fontSize: 32.0,
              fontWeight: FontWeight.w700,
            ),
          ),
        ),
      ],
    ),
  ),
);
Now run the app again.
Hence we have learned how to make an app with Tabs.
Here is the full code.
import 'package:flutter/material.dart';

void main() {
  runApp(MyApp());
}

class MyApp extends StatelessWidget {
  @override
  Widget build(BuildContext context) {
    return MaterialApp(
      title: 'TabView Tutorial All About Flutter',
      theme: ThemeData(
        primarySwatch: Colors.yellow,
      ),
      home: HomePage(),
    );
  }
}

class HomePage extends StatelessWidget {
  const HomePage({Key? key}) : super(key: key);

  @override
  Widget build(BuildContext context) {
    return DefaultTabController(
      length: 6,
      child: Scaffold(
        appBar: AppBar(
          title: Text("Tabs AAF"),
          bottom: TabBar(
            isScrollable: true,
            tabs: [
              Tab(
                icon: Icon(Icons.home),
                text: "Home",
              ),
              Tab(
                icon: Icon(Icons.account_box),
                text: "Account",
              ),
              Tab(
                icon: Icon(Icons.web),
                text: "Internet",
              ),
              Tab(
                icon: Icon(Icons.home),
                text: "Home",
              ),
              Tab(
                icon: Icon(Icons.account_box),
                text: "Account",
              ),
              Tab(
                icon: Icon(Icons.web),
                text: "Internet",
              ),
            ],
          ),
        ),
        body: TabBarView(
          children: [
            Center(
              child: Text(
                "Home",
                style: TextStyle(
                  fontSize: 32.0,
                  fontWeight: FontWeight.w700,
                ),
              ),
            ),
            Center(
              child: Text(
                "Account",
                style: TextStyle(
                  fontSize: 32.0,
                  fontWeight: FontWeight.w700,
                ),
              ),
            ),
            Center(
              child: Text(
                "Internet",
                style: TextStyle(
                  fontSize: 32.0,
                  fontWeight: FontWeight.w700,
                ),
              ),
            ),
            Center(
              child: Text(
                "Home",
                style: TextStyle(
                  fontSize: 32.0,
                  fontWeight: FontWeight.w700,
                ),
              ),
            ),
            Center(
              child: Text(
                "Account",
                style: TextStyle(
                  fontSize: 32.0,
                  fontWeight: FontWeight.w700,
                ),
              ),
            ),
            Center(
              child: Text(
                "Internet",
                style: TextStyle(
                  fontSize: 32.0,
                  fontWeight: FontWeight.w700,
                ),
              ),
            ),
          ],
        ),
      ),
    );
  }
}
Summary
So we learned how to create tabs in the Flutter app. WE learned four new widgets, Tabs, DefaultTabController, TabBar and TabBarView. Hope you liked the tutorial. If you have any doubts, comment below.